Post by Christina@Equus on Jun 5, 2012 18:08:05 GMT -5
Purpose • By default, the nameplated halter has three color presets, each with a Simlish text overlay. We know that people are going to want to make halters with their horses' names on them, so that's why this tutorial was created! It is a relatively short process, but this tutorial will hold your hand throughout the steps

Written by • Christina@Equus
Credits • Amanda from Morning Star Equestrian
Requirements • TSRW (Lastest Version), Nameplate Halter.wrk, NameplatePSD.psd, Photoshop

#1) Okay guys, let's get started by opening up TSRW. This should be what you see once it's opened, so just click "Create New Project"

#2) Click "New Import"

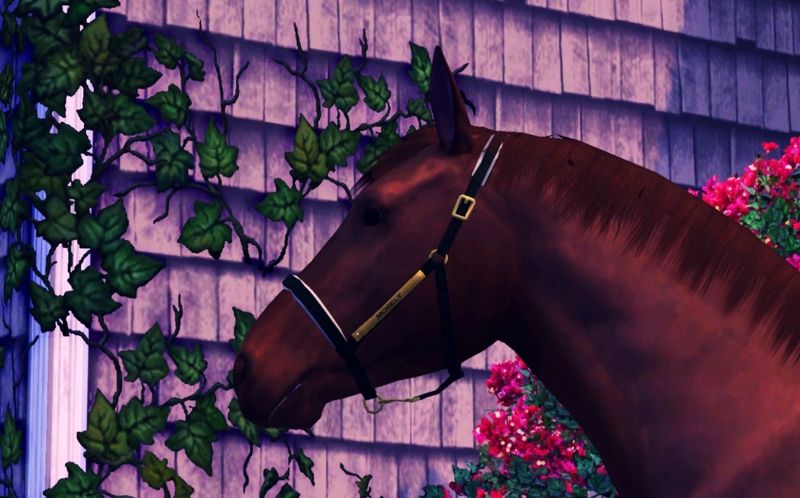
#3) Click "Browse"

#4) Find the "Nameplate Halter.wrk" that we provided for you at the beginning of this tutorial. Select it and click open.

#5) Click "Next"

#6) You may rename the PROJECT NAME and the TITLE. Then click "Next"

#7) Click "OK"

#8) The above drop-down box includes your camera controls. Play around enough to get a good view of the nameplate on the right side of the halter. Once you've done this, move on to step #9.

#9) Select the TEXTURE tab. Click the thumbnail next to OVERLAY and a button should appear that says "Edit" Click it.

#10) The IMAGE EDITOR will pop up. Minimize it and TSRW.

#11) Open PHOTOSHOP. Then open the file I provided for you above this tutorial named "NameplatePSD.psd"

#12/13) Select the TEXT TOOL. Select the font you want to use, or use the default that came with the PSD file, which should be Microsoft Sans Serif. If it is not this font by default, don't panic, just pick a font you want to use. I suggest using a font size of 36px and a sans serif font. Ensure that you have the text layer named "HORSE'S NAME" selected before moving to step #14.

#14) With the text layer selected, and the text tool selected, click on the vertical text that reads "NAME GOES HERE." Type in your horse's name and click the checkmark in the upper toolbar to complete the text tool. Once your finished with this, you can check the SILVER group if you would like to do a silver plate instead of a gold plate.

#15) Go to File...Save As...

#16) Name your file, ensure the image FORMAT is set to PNG , click Save. I recommend you save the file to your DESKTOP or some place that's easy to navigate to. You CAN use DDS files here, but since my version of Photoshop won't read the DDS file, this tutorial uses PNGs.

#17/18A) Back in TSRW, in the Texture Editor window, click "Import." A new window will pop up.

#17/18B) By default, TSRW will filter files by the DDS file format. If you saved your image as a PNG, change the filter to "tif, png." Find your file that you made and saved from Photoshop. Click "Open."

#19) Click "Continue"

#20) Click "Done"

#21) Click "Yes"

#22) Visually check to ensure that your name fits the nameplate okay and that you're happy with the way your nameplate looks. You can change the patterns in the lower right hand toolbar if you would like, or you can just change them in-game, up to you!
READ BEFORE LAST STEP: Creating Additional Recolors Within the Same File
If you would like to create additional recolors (nameplates with different names) within the same file (sims3pack), please read the following CAREFULLY:
• DIRECTLY UNDER the TEXTURE tab is a drop down menu that currently says "ahbridle" in it. If you were to click this drop down, there will only be ONE "ahbridle," meaning there is only one preset color for this mesh.
• To the RIGHT of this drop down menu is a button that resembles a "New Page" icon. Click it. A menu will drop down.
• Click "DUPLICATE" once. If something pops up saying that the current preset has been modified or something, just click YES.
• You will now be in the second preset color for this mesh. To double check this, click the drop down menu that says "ah bridle." You should now see two "ahbridle"s. Ensure you are indeed working on the second one. You should now repeat steps 14-20 of this tutorial.
• For all ADDITIONAL preset colors/patterns, you must select NO for STEP 21. YOU MUST SELECT NO OR ELSE ALL THE IMAGES YOU DUPLICATED WILL BE REPLACED. GOT IT? CLICK NO. NO!!! lol
• Repeat step 22 by visually checking to ensure your happy with your overlay.
• Repeat the above steps for creating more additional preset colors. I wouldn't exceed 10 preset colors at a time..and that may even be pushing it.

I REPEAT: For all ADDITIONAL preset colors/patterns, you must select NO for STEP 21. YOU MUST SELECT NO OR ELSE ALL THE IMAGES YOU DUPLICATED WILL BE REPLACED. GOT IT? CLICK NO. NO!!! lol
LAST STEP #23: Go to FILE -- EXPORT -- To Sims3Pack. Be sure to save this file to your Documents/Electronic Arts/The Sims 3/Downloads directory. It is ALWAYS recommended that you back up your current Sims 3 folder prior to installing any new custom content!
Something to note about TSRW: Once you complete step #23 (the exporting of the sims3pack), you MUST start up a new project if you plan to make additional halters. You can save your current project if you'd like to, but you must go to File - New and repeat the steps starting at #1 for additional sims3packs that you put together.