Post by Ann Taylor on Jun 22, 2012 16:55:57 GMT -5
Customizing your Nameplate
Having a nameplate for your box stall is nice, having a customized nameplate is even better! But customizing it seems to be some work. Actually it's not, and this tutorial will show you how to do it!
Written by • Anna@PRH
Requirements • TSRW (Lastest Version), Photoshop, dds-Plug-in for Photoshop, Nameplate.zip
Before you start save the Nameplat.zip file on your computer and unpack it to a place where you'll find it again.
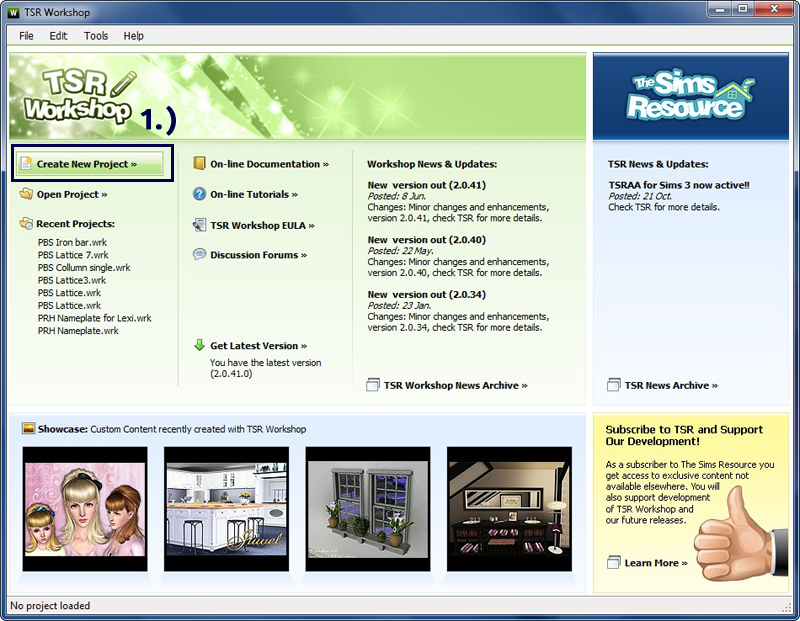
1.) Start by opening Tsrw and choosing "Create a new project".
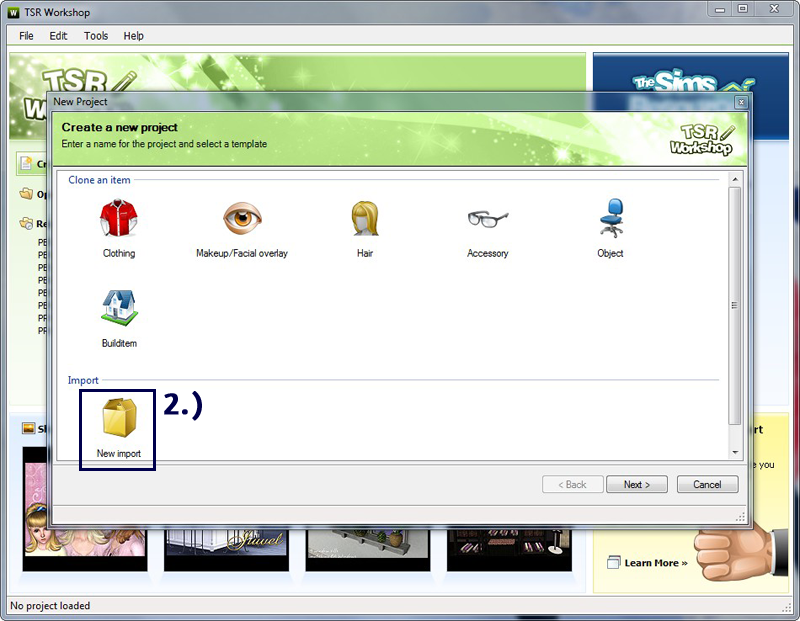
2.) Just click "New Import"
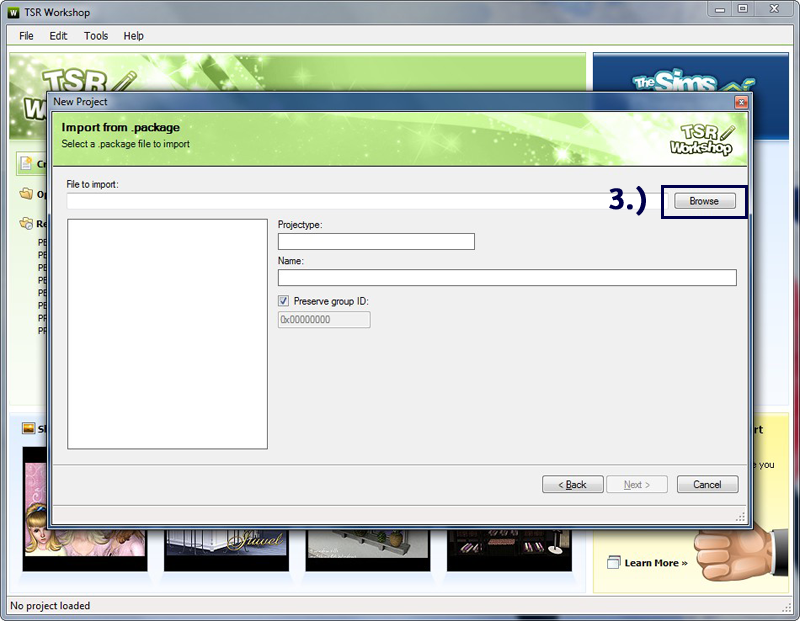
3.) Now click on "Browse"
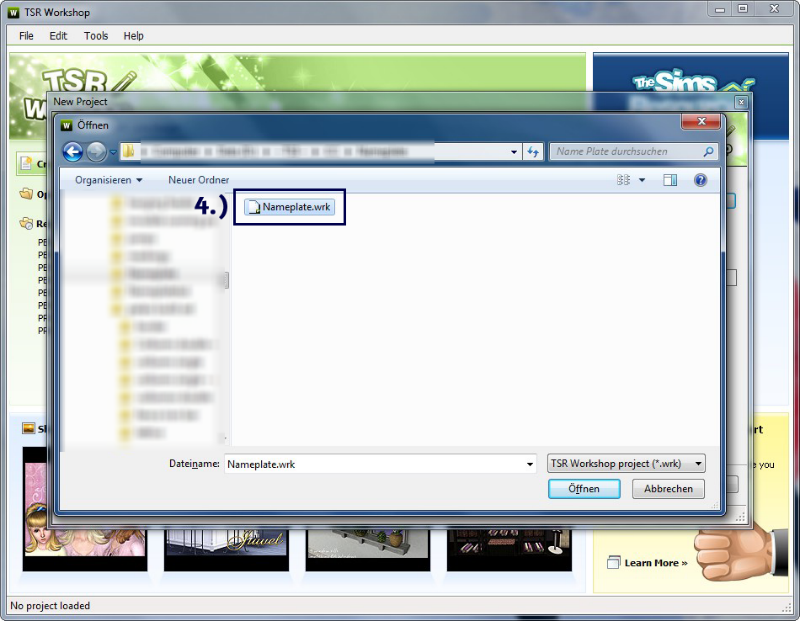
4.) Go to the folder where you unpacked the zip-file and chose "Nameplate.wrk". Then click on "Open".
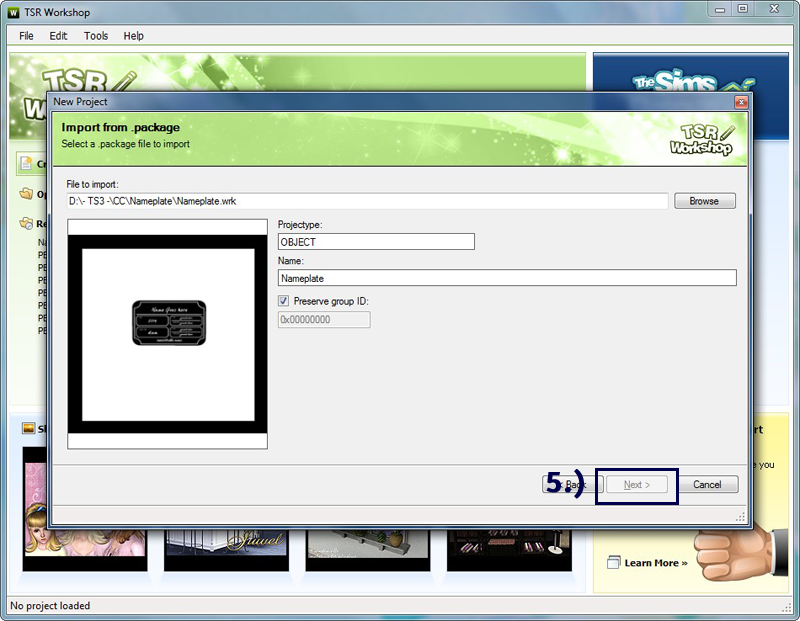
5.) Once it's loaded, click on "Next". (I accidentally took the sceenshot before it was fully loaded so the "Next" button was still greyed out)
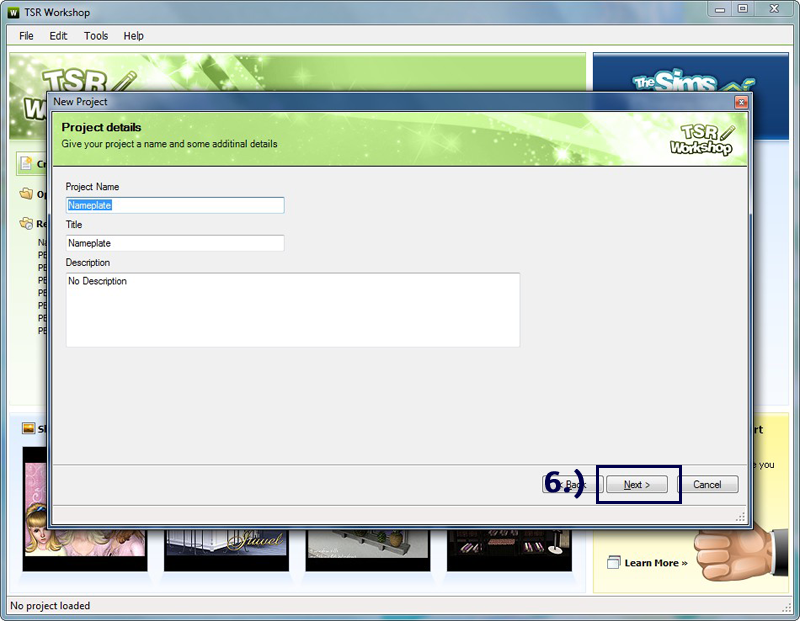
6.) If you want to, you can rename the "Project Name" and "Title". Then click "Next".

7.) Click "OK".
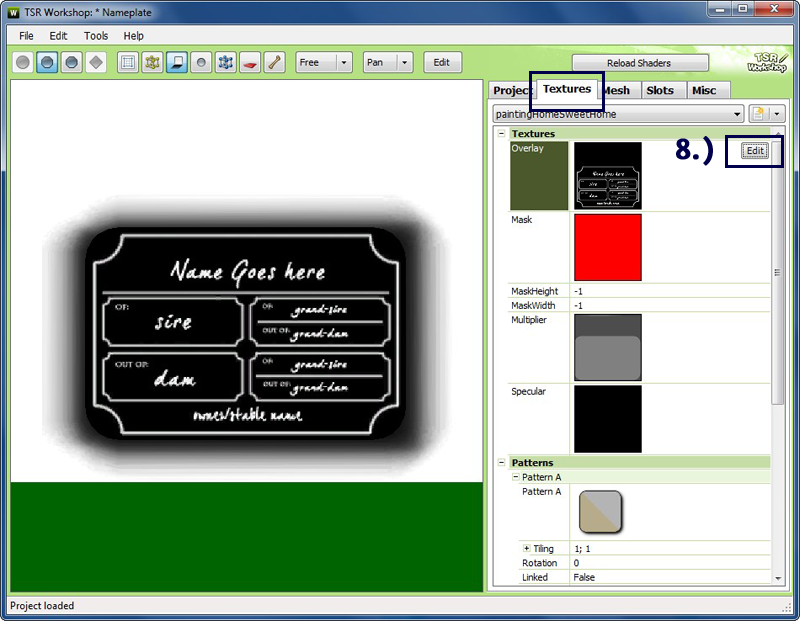
8.) The project will open now. Go to the "textures" tab and click on the image of the fiels labelled "Overlay". A button saying "Edit" will appear. Click it.
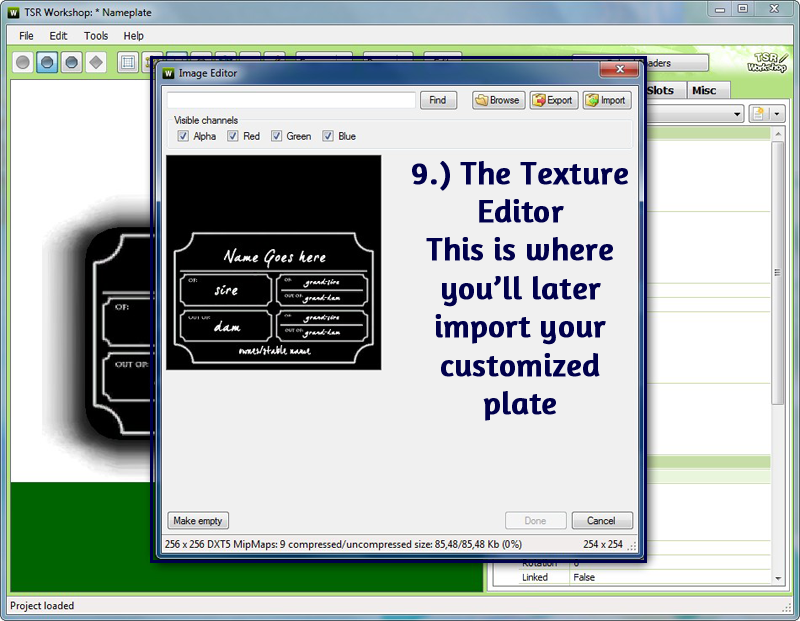
9.) A new window will open. This is the texture editor. You'll need it later on to import your customized nameplate texture.
Minimize Tsrw and open Photoshop.
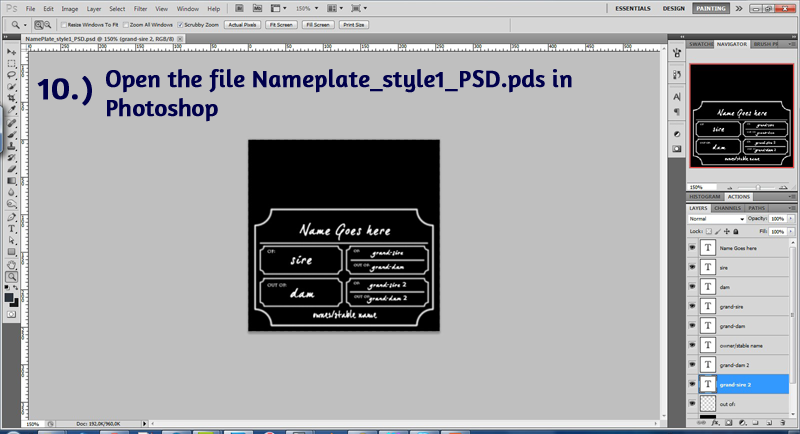
10.) Open the second file contained in the "Nameplate"-folder. It's labbeled "Nameplate_style1_PSD.psd".
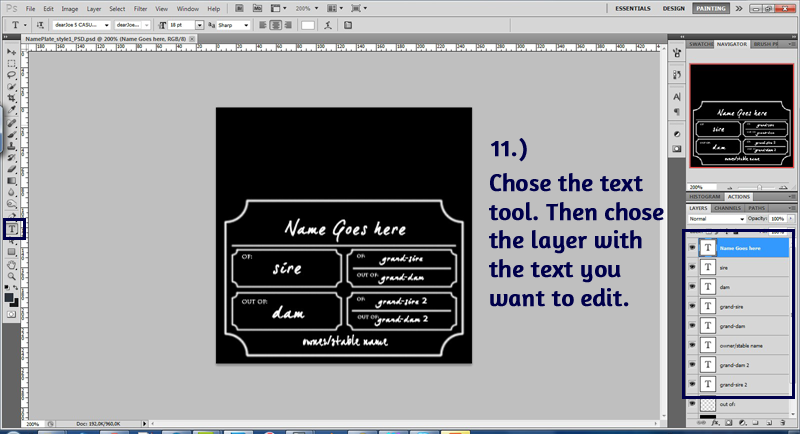
11.) Chose the text tool. On the right side, in the layers box, you'll see several text layers. They are all named according to the text on the nameplate they resemble. Choose the one you want to edit and click it to highlght it.
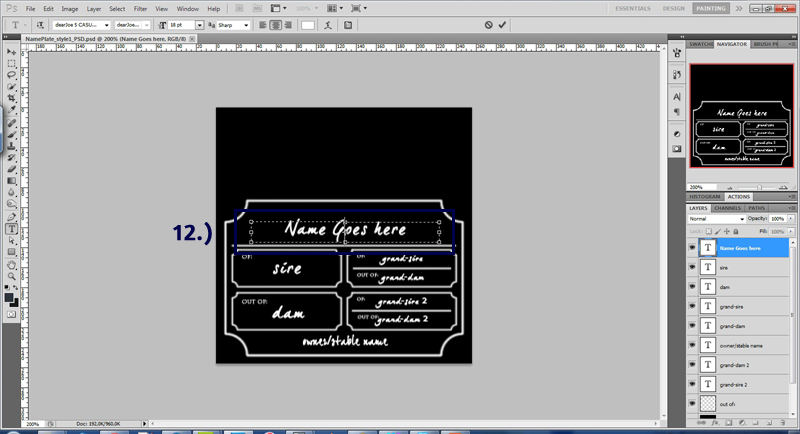
12.) Click on the text resembling the title of the layer. This is the text you'll edit. Now you can chose any font and size you want to use. (I used the demoversion of "dearJoe 5"). Write the name of your horse or whatever you want in the textfield. Click the checkmark in the upper toolbar to complete the task.
Repeat the steps 11.) and 12.) untill you've fully inscribed your nameplate.
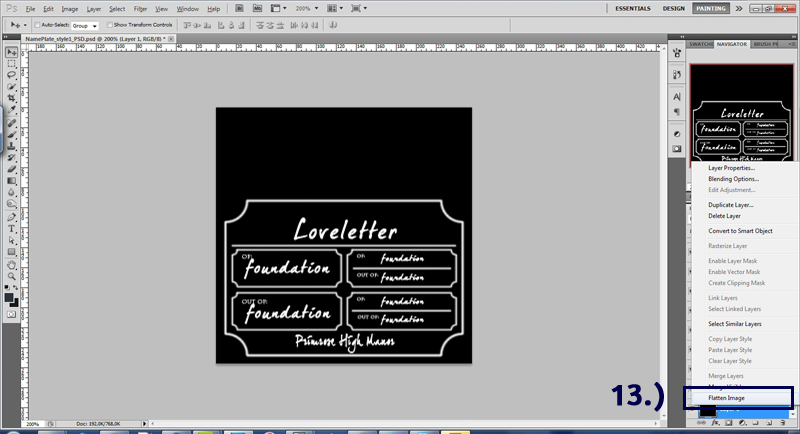
13.) Right-click the Background-layer and choose "Flatten Image".
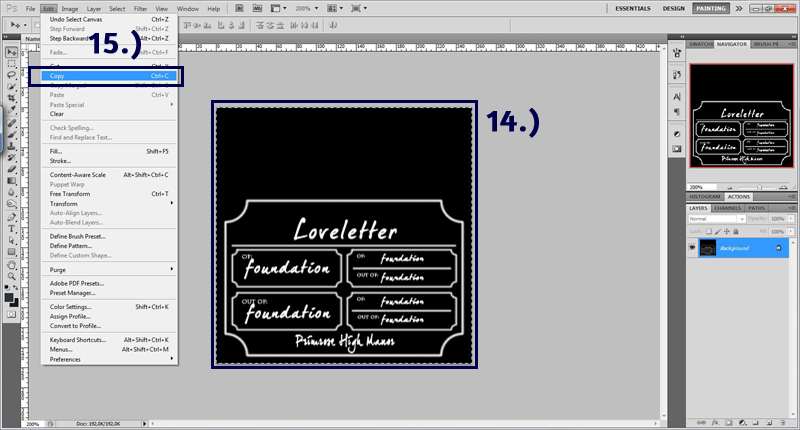
14.) Right now your nameplate looks pretty good, but it won't be recolorable once it's in your game. It needs an alpha channel. Choose the whole image either by going to the menu "select " > "all", or by clicking Strg+A on your keyboard.
Now copy your image.
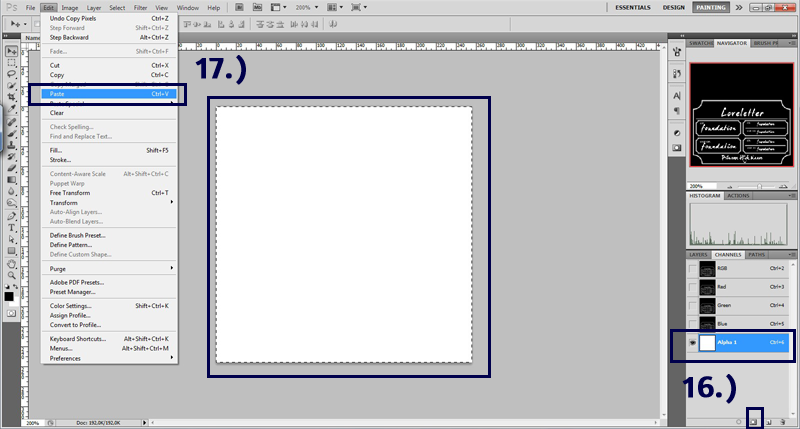
16.) Now go to the "channels" tab and click on the button which has a with a circle in a square on it at the bottom of the tab. A new channel should appear beneath the other channels. This is the alpha channel. It will regulate how much of your nameplate will be visible in the game. For the moment it doesn't matter if it appears black or white.
17.) Paste the nameplate image into the alpha channel, eithe by going into the menu "Edit" > "Paste" or by holding doen Srg + V on your keyboard.
Now your alpha channel sould look like this.

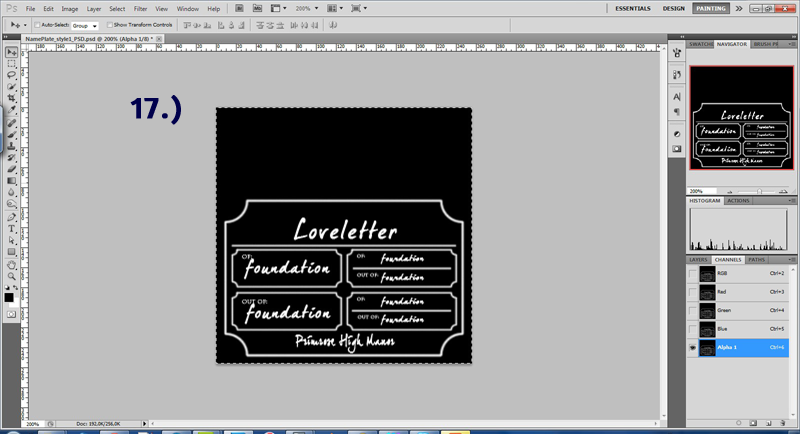
18.) Now save your file.
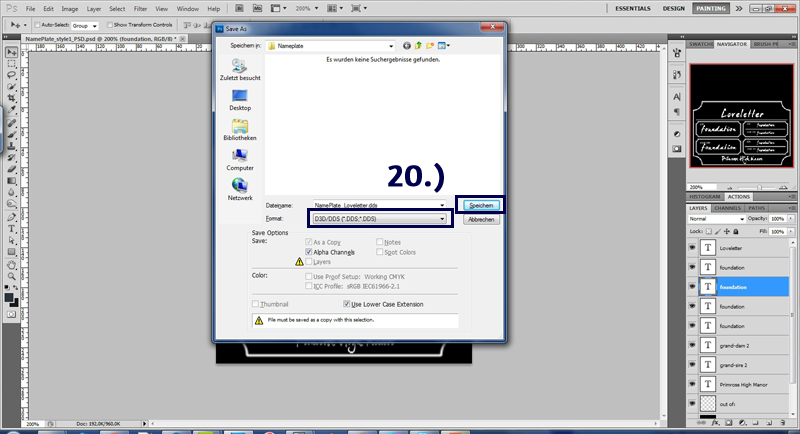
20.) Give your file a name that will identify it easily, especially if you want to make more then one nameplate. Make sure that "DDS" format is selected in the box under the name of the file. You'll need this so you can save your alpha channel. Click "Save".
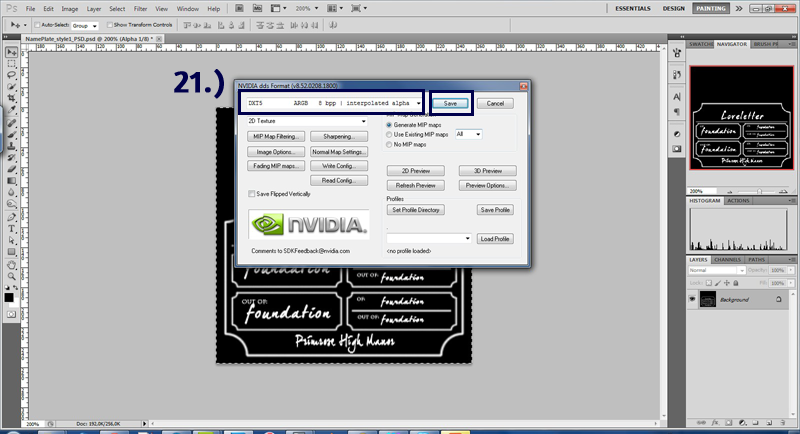
21.) Select "DXT5 / interpolated alpha" in the box at the top. Click "save".
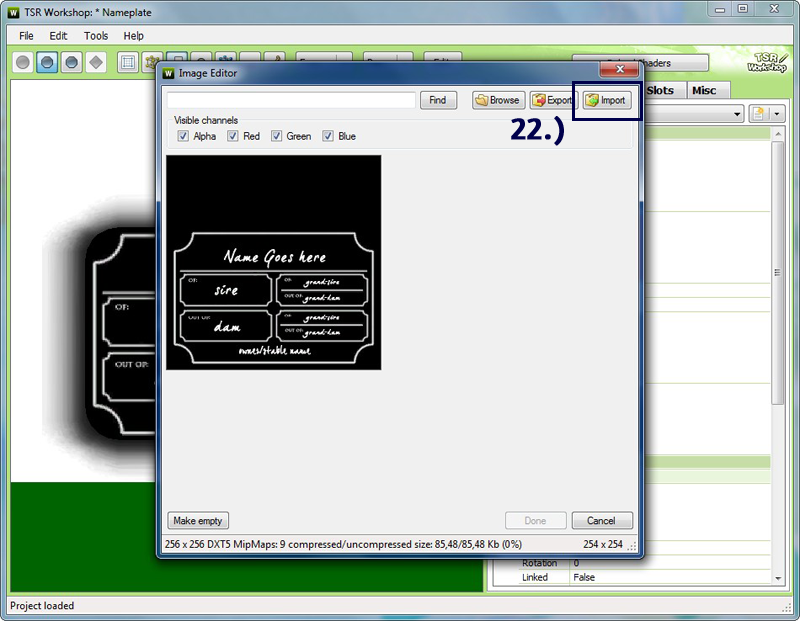
22.) Go back to Tsrw and click on "Import" in the texture editor.

23.) In the window that will open now, go to the place, where you saved your file and open it. It will look a bit strange but only the white parts of your nameplate should appear. If the whole nameplate is displayed you may not have saved as DXT5. Click "Done"
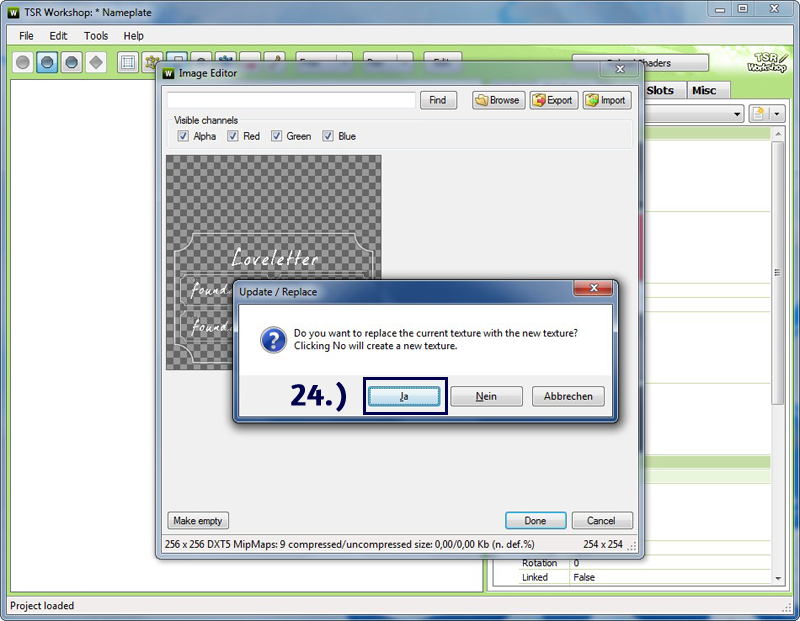
24.) In the window that pops up, and asks if you want to replace your texture, click "yes".
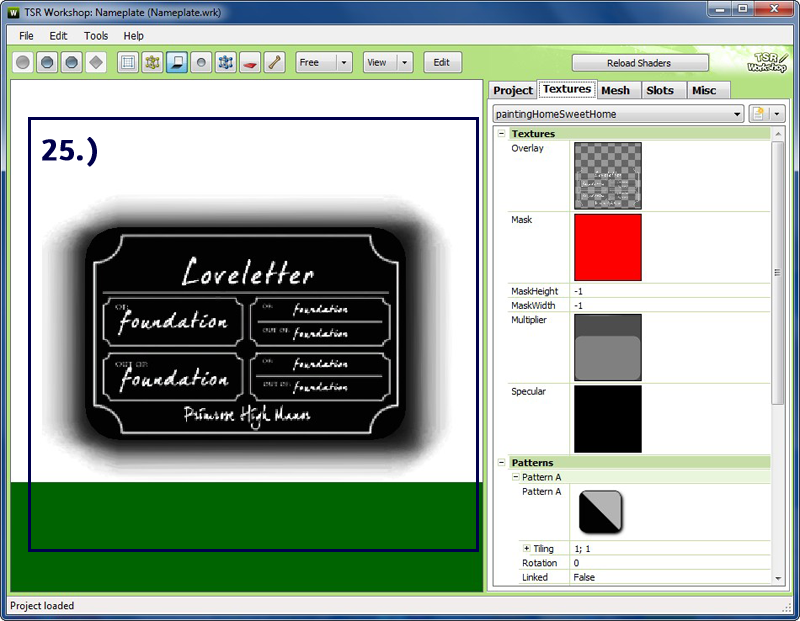
25.) Now you can see your nameplate in the 3D-Window of Tsrw. If it looks the way you want it to look, you can go on, if not go back to Photoshop and make the nessecary changes. Don't worry, if you can't properly read the text on the nameplate, as Tsrw only displayes objects at a very low resolution.
If you want to make only one Nameplate, go to step 29. If you want to add more versions of the nameplate, continue.
ADDITIONAL RECOLORS:
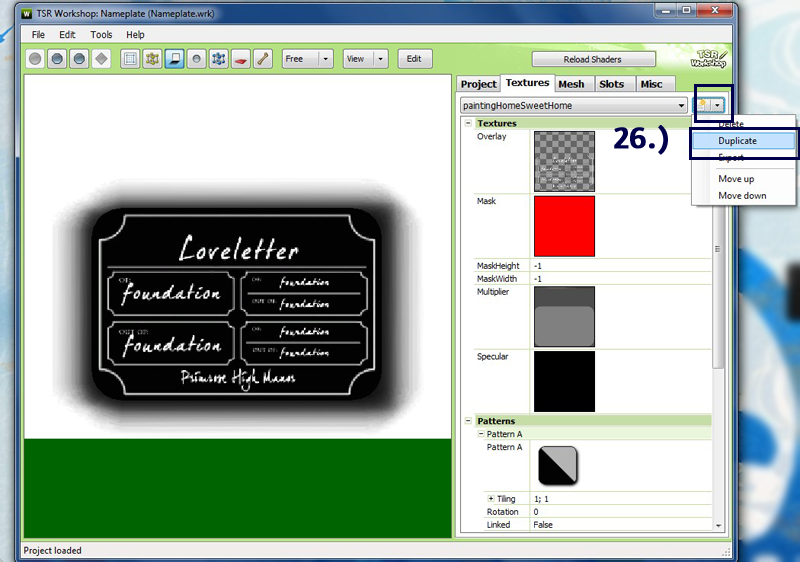
26.) In the textures tab, there is a button in the upper right corner. It has a piece of paper and an arrow on it. Click it and in the drop-down menu click on dublicate. This will make a new version of the nameplate.

27.) Next to the button you just clicked, there's another drop-down menu. All it's entries are labeled "Home sweet home". That is just the name of the cloned object, so you can ignore it. Click the lowest entry in this menu, to make sure, you do not actually change a version you did before.
Repeat steps 8.) to 23.) to get another version of the nameplate.
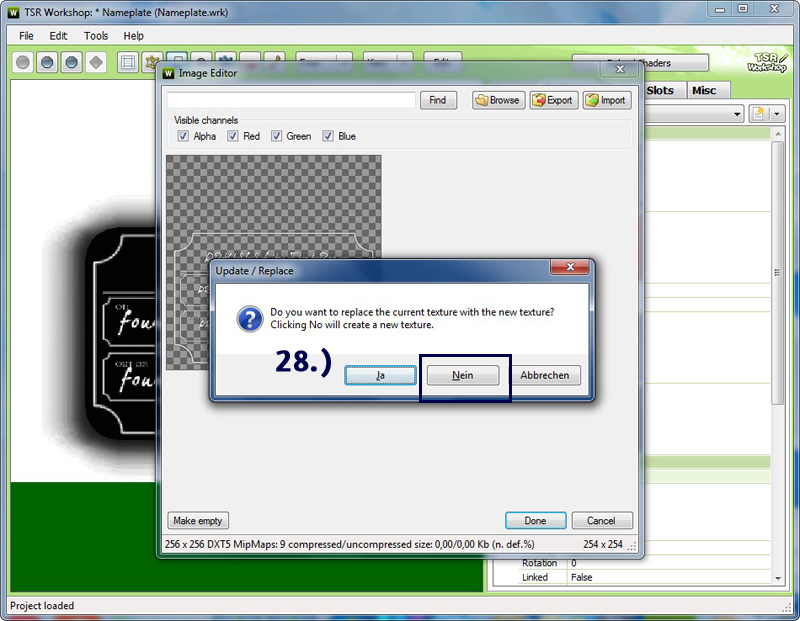
28.) The pop up will appear again. This time click "NO" or else you will replace every additional recolor you made with the file you just opened!.
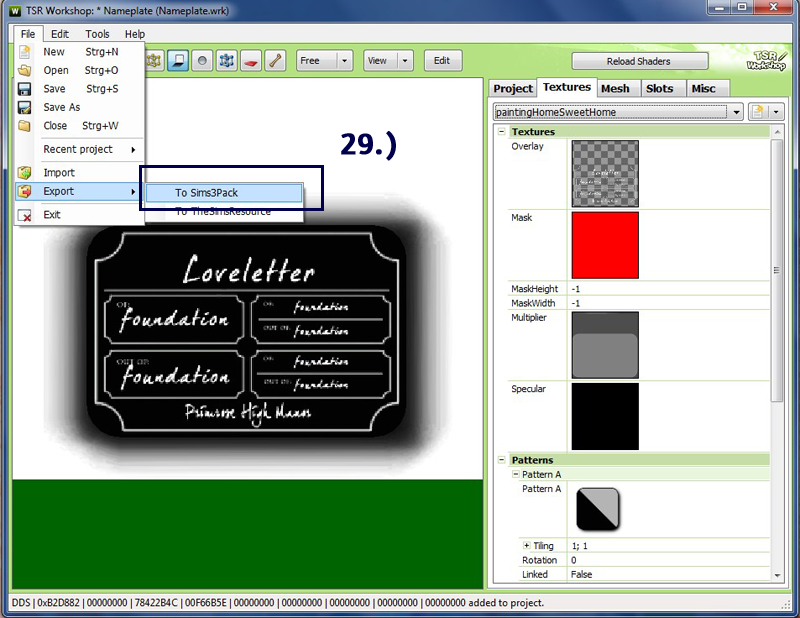
29.) You're finished! No go "File" > "Save", if you want to save your file as a .wrk file to come back to it later, or go to "File" > "Exports" > "To Sims3Pack". In the window that opens now chose the place where you want to save your Sims3Pack to. Then you just need to double.click it to install it.
If you want to make a second round of Nameplates you must start at 1.) and create a NEW file, or else all the nameplates you just made will be replaced by the new version in your game, and you wouldn't want that!.
1.) Start by opening Tsrw and choosing "Create a new project".
2.) Just click "New Import"
3.) Now click on "Browse"
4.) Go to the folder where you unpacked the zip-file and chose "Nameplate.wrk". Then click on "Open".
5.) Once it's loaded, click on "Next". (I accidentally took the sceenshot before it was fully loaded so the "Next" button was still greyed out)
6.) If you want to, you can rename the "Project Name" and "Title". Then click "Next".
7.) Click "OK".
8.) The project will open now. Go to the "textures" tab and click on the image of the fiels labelled "Overlay". A button saying "Edit" will appear. Click it.
9.) A new window will open. This is the texture editor. You'll need it later on to import your customized nameplate texture.
Minimize Tsrw and open Photoshop.
10.) Open the second file contained in the "Nameplate"-folder. It's labbeled "Nameplate_style1_PSD.psd".
11.) Chose the text tool. On the right side, in the layers box, you'll see several text layers. They are all named according to the text on the nameplate they resemble. Choose the one you want to edit and click it to highlght it.
12.) Click on the text resembling the title of the layer. This is the text you'll edit. Now you can chose any font and size you want to use. (I used the demoversion of "dearJoe 5"). Write the name of your horse or whatever you want in the textfield. Click the checkmark in the upper toolbar to complete the task.
Repeat the steps 11.) and 12.) untill you've fully inscribed your nameplate.
13.) Right-click the Background-layer and choose "Flatten Image".
14.) Right now your nameplate looks pretty good, but it won't be recolorable once it's in your game. It needs an alpha channel. Choose the whole image either by going to the menu "select " > "all", or by clicking Strg+A on your keyboard.
Now copy your image.
16.) Now go to the "channels" tab and click on the button which has a with a circle in a square on it at the bottom of the tab. A new channel should appear beneath the other channels. This is the alpha channel. It will regulate how much of your nameplate will be visible in the game. For the moment it doesn't matter if it appears black or white.
17.) Paste the nameplate image into the alpha channel, eithe by going into the menu "Edit" > "Paste" or by holding doen Srg + V on your keyboard.
Now your alpha channel sould look like this.
18.) Now save your file.
20.) Give your file a name that will identify it easily, especially if you want to make more then one nameplate. Make sure that "DDS" format is selected in the box under the name of the file. You'll need this so you can save your alpha channel. Click "Save".
21.) Select "DXT5 / interpolated alpha" in the box at the top. Click "save".
22.) Go back to Tsrw and click on "Import" in the texture editor.
23.) In the window that will open now, go to the place, where you saved your file and open it. It will look a bit strange but only the white parts of your nameplate should appear. If the whole nameplate is displayed you may not have saved as DXT5. Click "Done"
24.) In the window that pops up, and asks if you want to replace your texture, click "yes".
25.) Now you can see your nameplate in the 3D-Window of Tsrw. If it looks the way you want it to look, you can go on, if not go back to Photoshop and make the nessecary changes. Don't worry, if you can't properly read the text on the nameplate, as Tsrw only displayes objects at a very low resolution.
If you want to make only one Nameplate, go to step 29. If you want to add more versions of the nameplate, continue.
ADDITIONAL RECOLORS:
26.) In the textures tab, there is a button in the upper right corner. It has a piece of paper and an arrow on it. Click it and in the drop-down menu click on dublicate. This will make a new version of the nameplate.
27.) Next to the button you just clicked, there's another drop-down menu. All it's entries are labeled "Home sweet home". That is just the name of the cloned object, so you can ignore it. Click the lowest entry in this menu, to make sure, you do not actually change a version you did before.
Repeat steps 8.) to 23.) to get another version of the nameplate.
28.) The pop up will appear again. This time click "NO" or else you will replace every additional recolor you made with the file you just opened!.
29.) You're finished! No go "File" > "Save", if you want to save your file as a .wrk file to come back to it later, or go to "File" > "Exports" > "To Sims3Pack". In the window that opens now chose the place where you want to save your Sims3Pack to. Then you just need to double.click it to install it.
If you want to make a second round of Nameplates you must start at 1.) and create a NEW file, or else all the nameplates you just made will be replaced by the new version in your game, and you wouldn't want that!.